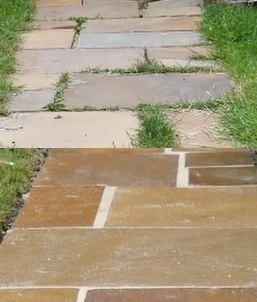
Garden slab paths can be a beautiful addition to any outdoor space, providing a practical and aesthetically pleasing way to navigate your garden. However, over time, the slabs in your path can become loose or uneven, detracting from the overall appearance and posing a potential safety hazard. In this blog post, we will explore the process of restoring slab garden paths, using a combination of slurry and Nexus Epoxy Resin for grouting.
Step 1: Identify Loose Slabs
The first step in restoring your slab garden path is to identify which slabs are loose or uneven. Walk along the path and look for any areas where the slabs are wobbling, sinking, or rocking. Use a small pry bar or chisel to lift each slab and determine whether the base underneath is stable. If the base is unstable, you may need to dig out the area and replace it with fresh, compacted gravel.
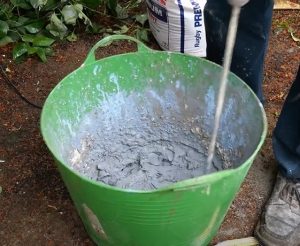
Step 2: Mix Slurry
Once you have identified the loose slabs, it’s time to mix up a batch of slurry. Slurry is a mixture of water, cement, and sand that is used to create a thin layer of bonding material between the slab and the base. Mix one part Portland cement to two parts sharp sand in a bucket, and then add water gradually until the mixture is smooth and creamy. You want the slurry to be thick enough to stick to the trowel but not so thick that it’s difficult to spread.
Step 3: Apply Slurry
Using a trowel, apply a thin layer of slurry to the base where the slab will sit. Make sure the slurry covers the entire area and is level with the surrounding base. Carefully lower the slab onto the slurry, making sure it is level and flush with the surrounding slabs. Tap the slab gently with a rubber mallet to ensure it is firmly in place.
Step 4: Mix Nexus Epoxy Resin
Once you have all the slabs in place, it’s time to grout the gaps between them using Nexus Epoxy Resin. Nexus is an epoxy resin that is ideal for use in outdoor applications because it is highly durable and resistant to weathering. Mix equal parts with some water in a bucket, and then stir thoroughly for at least two minutes.
Step 5: Apply Nexus Epoxy Resin
Using a small trowel or grout float, spread the Nexus Epoxy Resin over the gaps between the slabs. Make sure to push the resin down into the gaps, ensuring that there are no air pockets. Smooth the surface of the resin with the trowel, making sure it is level with the top of the slabs. Allow the resin to dry according to the manufacturer’s instructions.
Step 6: Finish
Brush off any residue off the surface of the slabs. If necessary, you can use a jointing tool or small brush to smooth out any rough edges. Finally, allow the resin to dry completely before walking on the path.
Conclusion
Restoring slab garden paths can be a simple and cost-effective way to improve the appearance and safety of your outdoor space. By using a combination of slurry and Nexus Epoxy Resin, you can fix loose slabs and create a durable and long-lasting grouting solution. Follow these steps to ensure your path is restored to its former beauty and functionality.
You can watch our transformation here using our slurry mix and nexus fusion epoxy sand.